How to Install a Home Solar Energy Storage System
There has never been a better time to take control of your home’s energy than right now. The world is shifting toward clean and independent power, and solar energy sits at the center of that revolution. Across neighborhoods, cities, and rural homes, people are waking up to the reality that sunlight can be their most reliable and cost-effective energy source. But if you want true freedom from blackouts and rising electricity costs, solar panels alone are not enough. You need energy storage , a battery system that saves your sunshine for the hours after sunset.
Installing a home solar energy storage system might sound complex, but with the right understanding and careful planning, anyone can do it or supervise professionals with confidence. This complete guide will walk you through everything from how the system works to how to install it, and what you must know to make it last for years.
1. Understanding How a Solar Energy Storage System Works
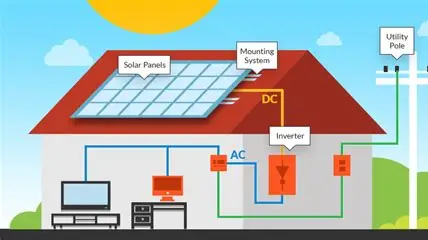
Before diving into installation, it’s crucial to understand the simple science behind solar storage. A solar panel captures sunlight and converts it into direct current (DC) electricity. That power flows to an inverter, which transforms it into alternating current (AC) ,the type your home appliances use. When the panels generate more energy than you immediately consume, that extra electricity doesn’t have to go to waste. Instead, it can be stored in a battery for later use, especially during the night or on cloudy days.
Imagine your solar battery as a savings account. During the day, your solar panels deposit energy into that account, and at night, you withdraw it to power your lights, refrigerator, or television. This energy independence is what makes solar storage systems so valuable. They let you use your own power when you need it most, instead of relying entirely on the grid.
2. Choosing the Right Solar Battery
Not all batteries are created equal, and choosing the wrong one can cost you performance and money. The most common types of batteries for home solar systems are lead-acid, lithium-ion, and saltwater batteries.
Lead-acid batteries have been around for decades. They are inexpensive but require more maintenance and have shorter lifespans. Lithium-ion batteries, like those used in smartphones and electric cars, are more efficient and compact. They charge faster, last longer, and take up less space. Saltwater batteries are newer, eco-friendly, and easy to recycle, though still less common.
For most homeowners, lithium-ion batteries strike the perfect balance between performance and price. They can last up to 15 years or more with proper care and deliver excellent efficiency. When choosing, always look at the battery’s capacity, measured in kilowatt-hours (kWh), and its depth of discharge, which tells you how much of its stored energy you can actually use without damaging it.
3. Sizing Your Solar Energy Storage System
Installing a battery that’s too small means you’ll still depend on the grid. Installing one too big can be unnecessarily expensive. The key is balance. To size your battery system properly, start by understanding your daily energy consumption. Check your electricity bills to see your average kilowatt-hour usage per day.
Then, look at how much energy your solar panels generate. For example, if your home consumes 20 kWh a day and your panels produce 25 kWh, you’ll have 5 kWh left to store. That extra energy can go into your battery for nighttime use.
You can also consider whether you want complete off-grid independence or partial backup. Some homeowners only want their battery to power essentials like lights, the refrigerator, and the internet during outages. Others prefer total self-sufficiency. Knowing your goal helps determine the right capacity and number of batteries for your setup.
4. Gathering Installation Equipment
Before installation, gather all the necessary tools and components. These include your solar panels, charge controller, inverter, battery bank, mounting racks, safety disconnects, wiring, and grounding equipment. The inverter is especially important because it determines how efficiently DC power becomes AC power for your home. Some inverters include built-in charge controllers, simplifying your setup.
Also, make sure your components are compatible. A mismatch between the inverter and battery voltage can lead to poor performance or even damage. It’s always wise to follow the manufacturer’s specifications carefully or consult a certified installer before connecting components.
5. Site Preparation and Safety
Solar energy installation involves electricity, so safety is not optional. Before starting, turn off the main power supply in your home. Choose a clean, well-ventilated space for your batteries, preferably indoors or in a shaded area away from direct sunlight and moisture. Batteries should be installed on nonflammable surfaces like cement floors and should never be exposed to extreme temperatures.
Plan your wiring route ahead of time to avoid unnecessary bends or exposure. If your battery and inverter are far from your solar panels, you may experience voltage drops, reducing efficiency. Keep connections tight and insulated, and ensure proper grounding to prevent electrical faults.
6. Mounting the Solar Panels
Start by installing the mounting structure, which holds the panels securely to your roof or ground. Make sure it’s positioned to capture maximum sunlight, typically facing south in the Northern Hemisphere or north in the Southern Hemisphere, with an angle that matches your location’s latitude. Secure all bolts and brackets tightly since wind and weather can loosen fittings over time.
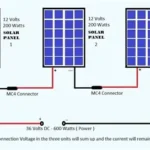
Once your mounts are ready, attach the panels carefully, connecting each one either in series, parallel, or a combination of both, depending on your system design. Series wiring increases voltage, while parallel wiring increases current. Most residential systems use a hybrid of both for optimal power and safety.
7. Connecting the System Components
After your panels are mounted, connect the wiring. The solar array should feed into a charge controller that regulates how much energy goes into your batteries, preventing overcharging. From the charge controller, connect to the battery bank, then from the batteries to the inverter. Finally, link the inverter output to your home’s electrical panel.
It’s crucial to maintain proper polarity — positive to positive, negative to negative , to avoid short circuits. Use high-quality connectors and weather-resistant cables rated for solar use. Double-check all connections before switching the system on.
8. Testing and Commissioning
Before powering up, test each part of the system with a multimeter. Check that your solar panels produce the expected voltage, that your batteries charge correctly, and that your inverter delivers stable AC power. Only after verifying all connections should you activate the system.
Monitor the system for a few days to ensure it performs as expected. Many modern inverters come with monitoring apps that show real-time energy production, battery levels, and system performance on your phone. This helps you detect problems early and optimize your energy usage.
9. Maintenance and Longevity
Solar energy storage systems are low-maintenance but not maintenance-free. Keep your panels clean and free from dust or leaves to maintain high efficiency. Inspect cables, connectors, and fuses regularly for wear or corrosion. For batteries, especially lead-acid types, check electrolyte levels and ensure proper ventilation.
Software updates from your inverter manufacturer can also improve performance and safety, so keep your system firmware current. A well-installed and well-maintained solar system can last 20 to 25 years or more, with the battery replaced every 10 to 15 years.
10. Benefits of Installing a Home Solar Energy Storage System
Installing your own solar energy storage system is not just about cutting your electricity bill. It’s about freedom and resilience. With storage, you can keep your home running even when the grid goes down. You protect yourself from energy price hikes and play a part in reducing carbon emissions. Your system can even earn you credits through net metering programs, allowing you to sell excess power back to the grid.
Beyond the numbers, solar energy brings peace of mind. It feels good to know that every sunrise powers your home, that your lights and appliances depend on the sky above, not on a utility company.
conclusion
Building your own solar energy storage system is an investment in the future. It combines technology, sustainability, and independence in one project that rewards you daily. While professional installation ensures maximum safety and efficiency, understanding each step helps you make informed choices and manage your system confidently.
Every wire you connect, every panel you mount, brings you closer to true energy freedom. The sun shines for everyone, but only those who capture it truly benefit. So start planning your system today, take charge of your power, and let the energy of tomorrow begin with your home.